Introduction to Scion 2D
![]()
Scion 2D is a simple 2D game engine written in C++ that I am creating for my YouTube channel for educational purposes and to become a better programmer. There is still lots of work to do; however, we are making some headway.
Technologies
- EnTT - Fast and reliable Entity Component System.
- SDL2 - a cross-platform library that provides an abstraction layer for computer multimedia hardware components.
- SDL_mixer - An audio mixer that supports various file formats for Simple Directmedia Layer.
- Dear ImGui - Immediate mode GUI for C++.
- Box2D - 2D physics engine for games.
- GLM - Mathematics library for graphics software.
- RapidJSON - Fast JSON parser and generator.
- sol2 - C++ Lua binding library.
- stb - Single-file public domain libraries.
- Lua - Powerful, efficient scripting language.
About
Asset Manager
The Asset Manager is what is used to store the games textures, fonts, music, soundFx, and shaders. Before the assets can be used in the game, they must be added into the asset manager successfully.
Functions:
addTexture
| Function | Description |
|---|---|
| addTexture(string, string, bool) | Attemps to add a new texture to the asset manager. It takes a string for the asset name, a string for the texture filepath, and a flag to set the texture to pixel art. Returns true if successful, false otherwise |
Example:
-- Add the hero texture to the asset manager
if AssetManager.addTexture("hero", "./assets/textures/hero.png", true) then
	print("Added texture [hero] successfully")
else
	print("Failed to add the [hero] texture.")
end

-- Consider adding all the textures and their paths to a table and looping.
addMusic
| Function | Description |
|---|---|
| addMusic(string, string) | Attemps to add a new music object to the asset manager. It takes a string for the asset name, a string for the music filepath. Returns true if successful, false otherwise |
Example:
-- Add the title music to the asset manager
if AssetManager.addMusic("title", "./assets/music/title.mp3") then
	print("Added music [title] to Asset Manager successfully")
else
	print("Failed to add the [title] music to the Asset Manager.")
end
addSoundfx
| Function | Description |
|---|---|
| addSoundfx(string, string) | Attemps to add a new soundFx object to the asset manager. It takes a string for the asset name, a string for the soundFx filepath. Returns true if successful, false otherwise |
Example:
-- Add the sword SoundFx to the asset manager
if AssetManager.addSoundfx("sword", "./assets/soundfx/sword.wav") then
	print("Added soundFx [sword] to Asset Manager successfully")
else
	print("Failed to add the [sword] soundFx to the Asset Manager.")
end
addFont
| Function | Description |
|---|---|
| addFont(string, string, float) | Attemps to add a new font .ttf object to the asset manager. It takes a string for the font name, a string for the font filepath, and a float for the font size (default 32.0). Returns true if successful, false otherwise |
Example:
-- Add the Pixel font to the asset manager
if AssetManager.addFont("pixel", "./assets/fonts/pixel.ttf", 32.0) then
	print("Added Font [pixel] to Asset Manager successfully")
else
	print("Failed to add the [pixel] font to the Asset Manager.")
end
Sample Lua Load Assets Function
-- Sample Assets table
AssetDefs =
{
	textures =
	{
		{ name = "test_texture", path = "assets/textures/test_texture.png", pixel_art = true },
	},
	music =
	{
		{ name = "test_music", path = "assets/music/test_music.mp3" },
	},
	sound_fx =
	{
		{ name = "test_sound", path = "assets/soundfx/test_sound.wav"},
	}
}

-- Sample LoadAssets function takes in the above assets table and loads
-- the entries into the AssetManager
function LoadAssets(assets)
	for k, v in pairs(assets.textures) do
		if not AssetManager.addTexture(v.name, v.path, v.pixel_art) then
			print("Failed to load texture [" ..v.name .."] at path [" ..v.path .."]")
		else
			print("Loaded Texture [" ..v.name .."]")
		end
	end

	for k, v in pairs(assets.music) do
		if not AssetManager.addMusic(v.name, v.path) then
			print("Failed to load music [" ..v.name .."] at path [" ..v.path .."]")
		else
			print("Loaded music [" ..v.name .."]")
		end
	end

	for k, v in pairs(assets.sound_fx) do
		if not AssetManager.addSoundfx(v.name, v.path) then
			print("Failed to load soundfx [" ..v.name .."] at path [" ..v.path .."]")
		else
			print("Loaded soundfx [" ..v.name .."]")
		end
	end
	-- TODO: Add other loading of assets as needed
end
Entity Component System
For our ECS we are using wrappers around the wonderful battle tested ENTT library! We have lua bindings for the registry, so we can get runtime views, entities, components and more.
Registry
TODO:
Functions
Runtime View Runtime views iterate over all of the entities that have all the given components that are passed into the function.
| Function | Description |
|---|---|
| for_each(sol::function) | This function will iterate over all of the entities that are in the runtime_view. It takes in a sol::function as a callback. The callback takes in the current entity so the user can perform actions on that entity. |
| exclude(sol::variadic_args) | The exclude function takes in a variable amount of args from the lua script. The arguments that are to be the desired components that we want to exclude from the runtime view. This should be done upon creation of the runtime view before using the for_each(...) function. |
Registry
| Function | Description |
|---|---|
| get_entities(sol::variadic_args) | The get_entities function takes in a variable amount of arguments. The arguments are to be the components that we want the entities to have. This will return a runtime_view of all the entities that have all of the entered components. |
| clear() | Clears the entire registry of the entities and the components. |
Example
	-- Get all the entities that have a Transform and Sprite Component
	-- Exclude entities with UI Components
	local view = Registry.get_entities(Transform, Sprite).exclude(UIComponent)

	-- Loop through the view and hide all of the sprites
	view:for_each(
		-- The for_each function takes in a callback function
		function (entity)
			local sprite = entity:getComponent(Sprite)
			sprite.bHidden = true
		end
	)
Entity
An entity is a game object that consists of a unique id number and is created and monitored by the Registry. Each entity can have various components. What this means is that there are pools of components and those components are owned by each of the specific entity ids.
Even though the entity is just an ID, our implementation of the entity uses an entt::entity as it's id
and also has some built in functions that we can use.
By default each entity has a name and a group to aid in the identification of the entity. We can use the name or the group
to filter the entities more thoroughly. See the below example:
-- Grab all the entities that have a sprite component
local view = Registry.get_entities(Sprite)

-- Create a simple table that will hold all the enemy entities
local Enemies = {}

-- Loop through the view and place all of the entities that
-- have a group name of "enemy" into the table
view:for_each(
	function (entity)
		if entity:group() == "enemy" then
			table.insert(Enemies, Entity(entity:id()))
		end
	end
)

-- Loop through the enemies and do some work
for k, v in ipairs(Enemies) do
	local get transform = v:getComponent(Transform)
	-- ...More work here with the enemies
end
Contstructors
| Constructor | Description |
|---|---|
| Entity(string name, string group) | This entity ctor takes in two arguments. A string for the name and a string for the group. The name and group can be empty strings "". |
| Entity(uint32_t id) | This entity ctor takes in the unique id of the entity and returns an entity object. The id number is a uint32. |
-- Create a new entity
local entity = Entity("name", "group")

-- Create a duplicate lua entity from the previous entity's id
local entityDupe = Entity(entity:id())
Components
This is a list of the components that can be used with the engine and their available functions and member variables.
Transform
The transform component contains the position, rotation, and scale of the entity.
Properties:
| Property | Functionality |
|---|---|
| position | A vec2 [x, y] for the world coordinates of the entity. |
| scale | A vec2 [x, y] for the scale. Used to increase/decrease the size of an entity. |
| rotation | A float value for the rotation of the entity in degrees. |
Use Example:
-- Create a new entity
local entity = Entity("tag", "group")

-- Add a new transform component at position [50, 50], scale of 1 and no rotation.
local transform = entity:add_component(Transform(vec2(50, 50), vec2(1, 1), 0.0))

-- access the transform properties
transform.position = vec2(100, 100)
transform.scale = vec2(2, 1)
transform.rotation = 45.0
Sprite
The sprite component contains all of the necessary properities for the sprite of an entity. A spirte has a width, height, layer, start_x, start_y, texture_name and UV values.
Properties:
| Property | Type | Functionality |
|---|---|---|
| width | float | width of the sprite in pixels |
| height | float | height of the sprite in pixels |
| layer | int | the layer of the sprite determines when it gets rendered. A lower layer will be rendered first. |
| start_x | int | determines the start x position for use in a texture atlas. If it is a single texture use 0. |
| start_y | int | determines the start y position for use in a texture atlas. If it is a single texture use 0. |
| bHidden | bool | used to hide the texture when we don't want it to be seen. |
| texture_name | string | the name of the sprite to use. The name MUST exist in the Asset Manager prior to use. |
| color | Color | The color of the sprite. Defaults to white or Color(255, 255, 255, 255). |
Functions:
| Function | Description |
|---|---|
| generate_uvs() | This function will take the width, height of the actual texture, and the start positions to populate the UV values for the texture atlas. UV values are u, v, uv_width, uv_height. |
Use Example:
-- Create a new entity
local entity = Entity("tag", "group")

-- Add a new sprite component
local sprite = entity:add_component(
	Sprite(
		"hero_sprite",	-- texture_name
		32,		-- width
		32,		-- height
		0, 		-- start_x
		0,		-- start_y
		2		-- layer
	)
)

-- After the sprite is created, you have to generate the uvs
sprite:generate_uvs()
Animation
The animation component is used to animate the sprite. It assumes that the sprite is part of a texture atlas and will adjust the current uv values based on the current frame.
Properties:
| Property | Type | Functionality |
|---|---|---|
| numFrames | int | The number of frames in the current animation. |
| frameRate | int | The speed of the animation. How fast the frames change per second. |
| frameOffset | int | The offset from the start position. If the offset is not used, a start position of 0 is assumed. |
| currentFrame | int | The frame that the animation is currently on. |
| startTime | int | The start time defaults to the current ticks upon creation. Used in the frame calculations. |
| bVertical | bool | Determines the direction of the animation scroll. True = vertically, False = horizontally. |
| bLooped | bool | If the animation is looped, it will reset the current frame to 0 once it reaches num_frames. If not looped, the user must call the reset() function to reset the animation. |
Functions:
| Function | Description |
|---|---|
| reset | Resets the current frame back to zero and sets the start_time to the current running ticks. |
Use Example:
-- Create a new entity
local entity = Entity("tag", "group")

-- Add a new animation component
local animation = entity:add_component(
	Animation(
		4,		-- Number of frames
		15,		-- Frame Rate
		0,		-- Frame Offset
		false,	-- bVertical == false == horizontal scroll
		true	-- Looped
	)
)
BoxCollider
The box collider is an axis-aligned rectangle that is used for collision detection. The collider positions itself based on the entity's Transform position.
Properties:
| Property | Type | Functionality |
|---|---|---|
| width | int | The width of the collider. |
| height | int | The height of the collider. |
| offset | vec2 | An offset of the origin. The origin is based on the Transform position [x, y]. |
| bColliding | bool | A flag used to inform if the collider is touching another collider. |
Use Example:
-- Create a new entity, if not already created.
local entity = Entity("tag", "group")

-- Add a new transform component at position [50, 50], scale of 1 and no rotation.
local boxCollider = entity:add_component(
	BoxCollider(
		32,			-- width
		32,			-- height
		vec2(0, 0)		-- offset
	)
)
CircleCollider
The circle collider 2D circle that is used for collision detection. The collider positions itself based on the entity's Transform position.
Properties:
| Property | Type | Functionality |
|---|---|---|
| radius | float | The radius of the circle collider. |
| offset | vec2 | An offset of the origin. The origin is based on the Transform position [x, y]. |
| bColliding | bool | A flag used to inform if the collider is touching another collider. |
Use Example:
-- Create a new entity, if not already created.
local entity = Entity("tag", "group")

-- Add a new transform component at position [50, 50], scale of 1 and no rotation.
local circleCollider = entity:add_component(
	CicleCollider(
		16,			-- radius
		vec2(0, 0)		-- offset
	)
)
Physics Component
The physics component controls all of the physics properties of an entity.
BodyType:
The rigid body type is an enum that is used to determine the type of body to be used. These are based on the Box2D b2BodyType. There are three rigid body types to choose from:
- STATIC
- Static bodies cannot be moved by other bodies. All movement must be done by the user.
- KINEMATIC
- Similar to a static body, that it is not affected by dynamic bodies; however, kinematic bodies can move. Perfect for moving platforms or walls.
- DYNAMIC
- Dynamic bodies are movable and will consume all the affects of forces and other bodies.
Use Example:
-- The use of the BodyType enum can be used as follows.
BodyType.Static
BodyType.Kinematic
BodyType.Dynamic

-- These are normally used when creating the Physics Attributes.
-- This will set the body type so the physics system knows how it should react to the body.
PhysicsAttributes:
These are the attributes that make up the Physics Component.
Properties:
| Property | Type | Functionality |
|---|---|---|
| eType | BodyType | enum for the type of body to use for the PhysicsComp. |
| density | float | The density of the body. Kg/m^2 . |
| friction | float | The coefficient of friction. Usually between values [0 - 1] |
| restitution | float | The coefficient of restitution. Determines the elasticity or bouncyness of a body. Usually between [0 - 1]. |
| restitutionThreshold | float | The velocity that a body must be >= before the restitution takes affect. |
| radius | float | The radius of the circle collider. ONLY USED IF THE SHAPE IS A CIRCLE. |
| gravityScale | float | The scale at which gravity is applied to the body. It is treated as a multiplier. A gravity scale of 1.0 would be normal gravity, where as 0.0 would be no gravity. |
| position | vec2 | The [x, y] coordinates of the body in the world. |
| scale | vec2 | The scale [x, y] of the collider. Used as a multiplied of the radius or box size. |
| boxSize | vec2 | The size [x == width, y == height] of the collider. ONLY USED IF THE SHAPE IS A BOX. |
| offset | vec2 | The offset from the origin of the collider. |
| bCircle | bool | Flag used when creating the body and to used the radius upon creation. |
| bBoxShape | bool | Flag used when creating the body and to used the boxSize upon creation. |
| bFixedRotation | bool | Flag that prevents the body from rotating. |
Use Example:
-- Create a default Physics Attributes object
local physicsAttribs = PhysicsAttributes()

-- Adjust properties to desired values, properties that are unchanged use default
physicsAttribs.eType = BodyType.Dynamic
physicsAttribs.density = 100.0			-- Set the density to 100 kg/m^2
physicsAttribs.friction = 0.2			-- Set the coefficient of friction to 0.2
physicsAttribs.restitution = 0.1		-- Set the coefficient of restitution to 0.2
physicsAttribs.radius = circle.radius 		-- Use the entity's CircleCollider radius
physicsAttribs.gravityScale = 2.0		-- Multiply the force of gravity by 2.0
physicsAttribs.position = transform.position	-- Use the entity's Transform position
physicsAttribs.scale = transform.scale		-- Use the entity's Transform scale
physicsAttribs.bCircle = true			-- Make the Fixture a circle
physicsAttribs.bFixedRotation = false		-- Allow rotation
PhysicsComp:
The actual physics component that can be added to the entity. The PhysicsComp takes in the PhysicsAttributes in order to create the underlying body, fixtures and set thier initial values. The user cannot access the actual physics body; however, has access to functions that will apply the desired changes to the rigid body.
Functions:
linearImpulse
| Function | Description |
|---|---|
| linearImpulse(vec2) | Applies an impulse at the position of the body. This will immediately modify the velocity of the rigid body. |
Example:
-- Get the physics component from the entity
local physics = entity:getComponent(Physics)

-- Apply a linear impulse
physics:linearImpulse(vec2(10000, 100))
angularImpulse
| Function | Description |
|---|---|
| angularImpulse(float) | Applies an angular impulse on the rigid body. Takes a float value for the impulse. |
Example:
-- Get the physics component from the entity
local physics = entity:getComponent(Physics)

-- Apply an angular impulse
physics:angularImpulse(45)
setLinearVelocity
| Function | Description |
|---|---|
| setLinearVelocity(vec2) | Sets the linear velocity of the center mass of the rigid body. |
Example:
-- Get the physics component from the entity
local physics = entity:getComponent(Physics)

-- Move the entity to the right with a velocity of 50
physics:setLinearVelocity(vec2(50, 0))
getLinearVelocity
| Function | Description |
|---|---|
| getLinearVelocity() | Returns a vec2 of the current linear velocity of the rigid body. |
Example:
-- Get the physics component from the entity
local physics = entity:getComponent(Physics)

-- Get the linear velocity
local velocity = physics:getLinearVelocity()
setAngularVelocity
| Function | Description |
|---|---|
| setAngularVelocity(float) | Sets the angular velocity of the rigid body in radians/second. |
Example:
-- Get the physics component from the entity
local physics = entity:getComponent(Physics)

-- Set the angular velocity
physics:setAngularVelocity(60)
getAngularVelocity
| Function | Description |
|---|---|
| getAngularVelocity() | Returns a float for the angular velocity of the rigid body in radians/second. |
Example:
-- Get the physics component from the entity
local physics = entity:getComponent(Physics)

-- Get the angular velocity or Omega
local omega = physics:getAngularVelocity()
setGravityScale
| Function | Description |
|---|---|
| setGravityScale(float) | Sets the gravity scale of the rigid body to increase/decrease the forcec of gravity that will be applied. |
Example:
-- Get the physics component from the entity
local physics = entity:getComponent(Physics)

-- Set the angular velocity
physics:setGravityScale(2.0)
Music and SoundFx
The Music and Sound players allow the user to play their desired music or sounds in the game. By default, there are 16 channels available to the user to use. There is only one channel that is dedicated for music, meaning that we can only have one music song playing at a time.
Music Player
The music player will only play sounds that have already been loaded into the Asset Manager. The music player is automatically opened when the engine boots up.
- Valid music file formats:
- MP3
- WAV
- OGG
Functions:
play
| Function | Description |
|---|---|
| play(string, int) | The play function takes in a string for the music name to be played and an int value for the number of loops. To loop indefinitely, set the loops to -1 or call the overloaded play function. |
| play(string) | This is an overload of the play function which calls the first play function and sets the loops automatically to -1. Takes in a string for the name of the song to be played. |
Example:
-- Play the title music
Music.play("title", -1) -- play the title music and loop continuously.
stop
| Function | Description |
|---|---|
| stop() | Stops the currently playing music. Only one song can play at a time, so no string is needed for the music name. |
Example:
-- Stop the music
Music.stop()
pause
| Function | Description |
|---|---|
| pause() | Pauses the currently playing music. Only one song can play at a time, so no string is needed for the music name. |
Example:
-- Pause the music
Music.pause()
resume
| Function | Description |
|---|---|
| resume() | Resume the currently paused music from the position where it was paused. |
Example:
-- Resume the music
Music.resume()
setVolume
| Function | Description |
|---|---|
| setVolume(int) | Sets the volume of the music player. Takes in an int value between [0 - 100]. |
Example:
-- Set the volume to 50%
Music.setVolume(50)
isPlaying
| Function | Description |
|---|---|
| isPlaying() | Checks to see if the music channel is currently playing. Returns true if the music is playing, false otherwise. |
Example:
-- Check if the music player is playing.
if Music.isPlaying() then
	Music.setVolume(50)
end
Sound Player
The sound player is used when we want small chunk soundFx played. The Sound Player, like the Music Player will only play sounds that have already been loaded into the Asset Manager. However, unlike the music player, the user must specify the channel that we want the music to be played on.
If the user chooses -1 for the channel, the sound FX will be played on any open channel. There there are no open channels,
the Sound Player will log an error.
- Valid sound fx file formats:
- MP3
- WAV
Functions:
play
| Function | Description |
|---|---|
| play(string, int, int) | The play function takes in a string for the soundFx name to be played and an int value for the number of loops and another int for the channel to play the sound on. |
| play(string) | This is an overload of the play function which calls the first play function and sets the loops automatically to 0, to only loop once, and sets the channel to -1, so it will play on any open channel. Takes in a string for the name of the soundFx to be played. |
Example:
-- Play the sword_slash soundFX
Sound.play("sword_slash", 0, -1) -- Don't loop and play on any open channel.
Sound.play("sword_slash")	-- Same as above; however, uses the default values.
stop
| Function | Description |
|---|---|
| stop(int) | stop function takes in an int for the channel that we want to stop playing. -1 will stop all channels. |
Example:
-- Stop channel 5
Sound.stop(5)
setVolume
| Function | Description |
|---|---|
| setVolume(int, int) | Sets the volume of the specified channel. The first value is the channel, the second value is the volume [0 - 100]. If the channel is -1, it will set the volume to all channels to the specified volume. |
Example:
-- Set the volume off all channels to 50%
Sound.setVolume(-1, 50)
Input Management
Keyboard
Currently, there can only be one keyboard present at any time. Users can use the keyboard inputs to control game actions, such as:
- Player Movement
- Menu Selections
- and much more
Mapped Keys:
Here is a list of the mapped keys and their names when using the keyboard:
Registerd Typewriter Keys
| KEY_A | KEY_B | KEY_C | KEY_D | KEY_E | KEY_F | KEY_G | KEY_H |
| KEY_I | KEY_J | KEY_K | KEY_L | KEY_M | KEY_N | KEY_O | KEY_P |
| KEY_Q | KEY_R | KEY_S | KEY_T | KEY_U | KEY_V | KEY_W | KEY_X |
| KEY_Y | KEY_Z | KEY_C | KEY_D | KEY_E | KEY_F | KEY_G | KEY_H |
| KEY_0 | KEY_1 | KEY_2 | KEY_3 | KEY_4 | KEY_5 | KEY_6 | KEY_7 |
| KEY_8 | KEY_9 |
| KEY_ENTER | KEY_BACKSPACE | KEY_ESC | KEY_SPACE | KEY_LALT | KEY_LSHIFT |
| KEY_LCTRL | KEY_RCTRL | KEY_RALT | KEY_RSHIFT |
Registerd Function Keys
| KEY_F1 | KEY_F2 | KEY_F3 | KEY_F4 | KEY_F5 | KEY_F6 | KEY_F7 | KEY_F8 |
| KEY_F9 | KEY_F10 | KEY_F11 | KEY_F12 |
Registerd Cursor Control Keys
| KEY_UP | KEY_RIGHT | KEY_DOWN | KEY_LEFT |
Keyboard Functions:
| Function | Description |
|---|---|
| just_pressed(key) | The just pressed function is used when the user only wants the key to register once per press, and the reset upon release. |
| just_released(key) | This will return true whenever the key argument has been released. |
| pressed(key) | Returns true whenever the button is held down. Used when the user needs continuous input from the key. |
Example Usage:
local physics = entity:get_component(Physics)

-- Set the linear velocity of the entity based on the WASD keys
if Keyboard.pressed(KEY_W) then
	physics:set_linear_velocity(vec2(0, 50))
elseif Keyboard.pressed(KEY_S) then
	physics:set_linear_velocity(vec2(0, -50))
elseif Keyboard.pressed(KEY_A) then
	physics:set_linear_velocity(vec2(-50, 0))
elseif Keyboard.pressed(KEY_D) then
	physics:set_linear_velocity(vec2(50, 0))
end

-- Have the entity jump if space bar is pressed
if Keyboard.just_pressed(KEY_SPACE) then
	physics:linear_impulse(vec2(0, -10000)
end
Mouse
Mapped Mouse Buttons
| Name | Button |
|---|---|
| LEFT_BTN | Left mouse button |
| MIDDLE_BTN | Middle mouse button |
| RIGHT_BTN | Right mouse button |
Mouse Functions:
| Function | Description |
|---|---|
| just_pressed(btn) | The just pressed function is used when the user only wants the button to register once per press, and then reset upon release. |
| just_released(btn) | This will return true whenever the button has been released. |
| pressed(btn) | Returns true whenever the button is held down. Used when the user needs continuous input from the button. |
| world_position() | Returns a vec2 of the current world coordinates of mouse. These are screen coordinates that have been converted. |
| screen_position() | Returns a vec2 of the current screen coordinates of mouse. |
| wheel_x() | If your mouse has a x wheel, this will return either 1 or -1 depending on the rotation direction. |
| wheel_y() | Returns either 1 or -1 depending on the rotation direction. |
Gamepad
The gamepad is based on an XBox-style gamepad. Scion2D supports up to 4 controllers/gamepads. The gamepad usually will have two analog thumb sticks, a D-Pad, four face buttons, two shoulder buttons, two analog trigger buttons, and two center buttons.
Action Buttons
| Button | Type | Description |
|---|---|---|
| GP_BTN_A | action button | One of the four action buttons on the controller. Usually the A button on the XBox and the Circle button on a playstation style controller. |
| GP_BTN_B | action button | One of the four action buttons on the controller. Usually the B button on the XBox and the Circle button on a playstation style controller. |
| GP_BTN_X | action button | One of the four action buttons on the controller. Usually the X button on the XBox and the Circle button on a playstation style controller. |
| GP_BTN_A | action button | One of the four action buttons on the controller. Usually the Y button on the XBox and the Circle button on a playstation style controller. |
Special Buttons
| Button | Type | Description |
|---|---|---|
| GP_BTN_BACK | special button | One of the three special buttons on the controller. Usually the SELECT button on the XBox and the Circle button on a playstation style controller. |
| GP_BTN_START | special button | One of the three special buttons on the controller. Usually the START button on the XBox and the Circle button on a playstation style controller. |
| GP_BTN_GUIDE | special button | One of the three special buttons on the controller. May not be supported by your controller. |
Axes
The axes are buttons and joysticks that use analog input values rather than a digital/bool input.
| Button | Type | Description |
|---|---|---|
| AXIS_X1 | x axis | Axis X1 is the horizontal axis of the LEFT analog stick. The analog values are -32768 for fully left and 32767 for fully right. |
| AXIS_Y1 | y axis | Axis Y1 is the vertical axis of the LEFT analog stick. The analog values are -32768 for fully up and 32767 for fully down. |
| AXIS_X2 | x axis | Axis X2 is the horizontal axis of the RIGHT analog stick. The analog values are -32768 for fully left and 32767 for fully right. |
| AXIS_Y2 | y axis | Axis Y2 is the vertical axis of the RIGHT analog stick. The analog values are -32768 for fully up and 32767 for fully down. |
| AXIS_Z1 | z axis | Axis Z1 is the axis for the LEFT trigger analog. The analog values are -32768 for fully released and 32767 for fully pressed. |
| AXIS_Z2 | y axis | Axis Z2 is the vertical axis of the RIGHT trigger analog. The analog values are -32768 for fully released and 32767 for fully pressed. |
Hat Values
Not all controllers have hats. The hat is basically the DPAD; however, it also has the diagonal directions. We use the hat values based on a number that is returned depending on the direction that is pressed. The typical hat values are as follows:
| Direction | Hat Value |
|---|---|
| UP | 1 |
| RIGHT | 2 |
| UP RIGHT | 3 |
| DOWN | 4 |
| DOWN RIGHT | 6 |
| LEFT | 8 |
| UP LEFT | 9 |
| DOWN LEFT | 12 |
Functions:
All of the controller functions take the index of which controller is being used. We are allowed up to 4 controllers
in the engine. The index is basically the SLOT of the controller.
| Function | Description |
|---|---|
| just_pressed(index, btn) | The just pressed function is used when the user only wants the btn to register once per press, and the reset upon released. |
| just_released(index, btn) | This will return true whenever the btn argument has been released. |
| pressed(index, btn) | Returns true whenever the button is held down. Used when the user needs continuous input from the btn. |
| get_axis_position(index, axis) | This will return an analog value for the desired axis. The value returned will be between -32768 and 32767. Please see the Axes for more information. |
| get_hat_value(index) | This will return the current value of the controllers HAT, if the controller has a hat. Please see the Hat Values for more information. |
Examples
Left Stick Analog
	-- Get current x speed from the analog value
	local x_analog = Gamepad.get_axis_position(1, AXIS_X1)
	local x_multiplier = x_analog / 32768
	local x_speed = speed * x_multiplier

	-- Get current y speed from the analog value
	local y_analog = Gamepad.get_axis_position(1, AXIS_Y1)
	local y_multiplier = y_analog / 32768
	local y_speed = speed * y_multiplier

	-- Set the linear velocity
	local physics = entity:get_component(Physics)
	physics:set_linear_velocity(x_speed, y_speed)

	-- This does not take into consideration the dead zone of the axis
	-- The dead zone varies from controller to controller
Using hat values for movement
	-- Get the hat value for controller 1
	local direction = Gamepad.get_hat_value(1)

	-- move the player based on the current hat value
	if direction == 0 then
		-- TODO: Stop the player
	elseif direction == 1 then
		-- TODO: Move the player up
	elseif direction == 2 then
		-- TODO: Move the player right
	elseif direction == 3 then
		-- TODO: Move the player up to the right
	elseif direction == 4 then
		-- TODO: Move the player down
	elseif direction == 6 then
		-- TODO: Move the player down to the right
	elseif direction == 8 then
		-- TODO: Move the player left
	elseif direction == 9 then
		-- TODO: Move the player up to the left
	elseif direction == 12 then
		-- TODO: Move the player down to the left
	end

	-- This is a simplification of what we could use
	-- the hat values for.
Using just_pressed for UI
	if Gamepad.just_pressed(1, GP_DPAD_UP) then
		-- Move cursor up
	elseif Gamepad.just_pressed(1, GP_DPAD_RIGHT) then
		-- Move cursor right
	elseif Gamepad.just_pressed(1, GP_DPAD_DOWN) then
		-- Move cursor down
	elseif Gamepad.just_pressed(1, GP_DPAD_LEFT) then
		-- Move cursor left
	end
Camera
The camera is a simple 2D camera that uses orthographic projection under the hood. You can use the camera to adjust the position of the game world, convert screen coordinates to world coordinates, zoom in and zoom out by setting the scale of the camera, and more.
The user cannot current create there own instance of the camera; however, they can access the main camera and use the functions provided.
The camera is basically a Rect that will show what is inside of it. It has a position, scale, width, and height.
TODO: Eventually, all games will have a settings file to allow the creator to adjust the camera width/height, along with the window width for each game. That is currently under construction.
Functions:
| Function | Description |
|---|---|
| get() | The get function will return an reference to the camera. |
| position() | This will return the current position of the top left corner or the camera. |
| set_position(vec2) | In order to move the camera, the user must set the position of the camera. It takes in a vec2 for the new position. |
| scale() | This will return the current scale of the camera. The scale is a float value. Default scale is 1.0 |
| set_scale(float) | This will set the new scale of the camera. It will allow the user to zoom in and out. |
| width() | This will return the current width of the camera. The width of the camera is set based on the width of the window when the game is created. |
| height() | This will return the current height of the camera. The height of the camera is set based on the height of the window when the game is created. |
Examples
Move Camera Position
	-- Get an instance of the camera
	local cam = Camera.get()

	-- Get the camera position, since it does not have a ctor
	-- we use the '.' operator rather than the ':'.
	local cam_pos = cam.position()

	-- Move the camera in the x direction on every update
	cam.set_position(vec2(cam_pos.x + 10, cam_pos.y))
Set Camera Scale
	-- Get an instance of the camera
	local cam = Camera.get()

	-- Set the camera scale to 4. This will zoom in by 4x.
	-- So if the sprite is 16x16px, it will now look 64x64px.
	cam.set_scale(4.0)
These functions will control the main camera. If you want to use the camera to follow a specific player or entity, try to make use of the Follow Camera or create a lua class that will control the camera any way you see fit.
Follow Camera
The FollowCamera can be used to follow the movement of a specific character or entity in your game.
FollowCamParams
The follow camera params are the parameters that are used to help control the follow camera.
Properties:
| Property | Type | Functionality |
|---|---|---|
| min_x | float | The minimum x position in the world that the camera can be. The camera will stop moving once it reaches this position. |
| min_y | float | The minimum y position in the world that the camera can be. The camera will stop moving once it reaches this position. |
| max_x | float | The maximum x position in the world that the camera can be. The camera will stop moving once it reaches this position. |
| max_y | float | The maximum y position in the world that the camera can be. The camera will stop moving once it reaches this position. |
| scale | float | Usually the current scale of the main camera. Used in the movement and boundary calculations internally. |
| springback | float | This controls how fast the camera follows the player. Range [0 - 1]. If the springback is set to 1, the camera will follow directly with the player. Values less than 1 will lag behind the player and catch up when the player stops or the camera boundaries have been reached. |
Examples
	-- There are two ctors for FollowCamParams
	-- First takes a lua table {}
	local followCamParams1 = FollowCamParams(
		{
			min_x = 0,
			min_y = 0,
			max_x = WindowWidth(),	-- Get the Window Width from the engine
			max_y = WindowHeight(),	-- Get the Window Height from the engine
			scale = 4.0,		-- Set the camera scale to 4
			springback = 0.2		-- Follow slightly behind the character
		}
	)

	-- The Second ctor uses arguments
	local followCamParams2 = FollowCamParams(
		0, 0, WindowWidth(), WindowHeight(), 4.0, 0.2
	)
FollowCamera Functionality
In order to create a new follow camera, we need to pass in the Desired FollowCamParams and the Entity that we want the camera to follow.
| Function | Description |
|---|---|
| update() | Updates the position of the camera based on the FollowCamParams and the current position of the player. The camera will center around the player, unless the camera has reached it's boundaries. |
| set_params(FollowCamParams) | Re-sets the follow cam parameters to the new desired parameters |
| set_entity(Entity) | Sets a new entity for the camera to follow. This allows the user to change what the camera is following on the fly. |
| set_springback(float) | This will adjust the springback to the desired value. The springback is clamped to [0 - 1]. |
| get_params() | Returns the current FollowCamParams |
Example
	-- Create a new followCam
	local followCam = FollowCamera(
		FollowCamParams(0, 0, WindowWidth(), WindowHeight(), 4.0, 0.5),
		playerEntity -- We need to pass in the entity we want the camera to follow.
	)

	-- We need to always update the camera in our main update loop
	-- This will ensure that the camera is following the player's
	-- movement
	followCam:update()
Lua Functions
S2D_RunScript
| Function | Description |
|---|---|
| S2D_RunScript(string) | Attemps to run the passed in lua script. It takes a string for the script path. Returns true if successful, false otherwise. There will also be a log of why the script failed. |
Example:
-- Run the script list table
if not S2D_RunScript("scipts/script_list.lua") then
	S2D_error("Failed to run lua script")
end
S2D_LoadScriptTable
| Function | Description |
|---|---|
| S2D_LoadScriptTable(sol::table) | This will attempt to run a lua table filled with the path of lua scripts to run. If running a script fails, it will log an error with the reason for failing. |
Example:
-- Script List Example
ScriptList =
{
	"game/scripts/assetDefs.lua",
	"game/scripts/utilities.lua",
	"game/scripts/player.lua",
	-- ... More scripts here
}

-- Run all the scripts in the table
S2D_LoadScriptTable(ScriptList)
S2D_MeasureText
| Function | Description |
|---|---|
| S2D_MeasureText(string text, string font) | Takes in a string of text and the desired font and returns the width of the text as a float. |
Example:
-- Script List Example

local transform = entity:get_component(Transform)
local text = entity:get_component(TextComponent)
local textWidth = S2D_MeasureText(text.textStr, text.fontName)

-- Center the entity to the window width
transform.position = (S2D_WindowWidth() * 0.5) - (textWidth * 0.5)
Logging Functions
These logging functions use the common placeholder and formatting options:
| Placeholder | Description |
|---|---|
| %s | Placeholder for a string. |
| %c | Placeholder for a character. |
| %d | Placeholder for an integer number. |
| %f | Placeholder for a float number. |
| %.nf | Designates the number of decimal places. Where 'n' is the number of points. |
| %x | Placeholder for a hexidecimal number. |
S2D_log
| Function | Description |
|---|---|
| S2D_log(string, ...) | The string to be formatted in the log followed by the variadic arguments. |
Example:
-- Logging Example

S2D_log("My name is %s. I am %d years old", "Scion", 2)

S2D_warn
| Function | Description |
|---|---|
| S2D_warn(string, ...) | The string to be formatted in the log followed by the variadic arguments. |
Example:
-- Warning Example
Names =
{
"Jack", "Jill", "Steve"
}
local nameToFind = "Scion"
local bFound = false
for _, v in pairs(Names) do
if v == nameToFind then
bFound = true
break
end
end
if not bFound then
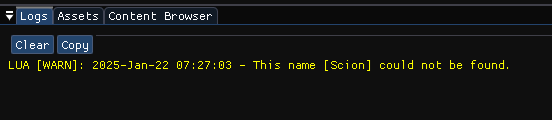
S2D_warn("This name [%s] could not be found.", nameToFind)
else
S2D_log("This name [%s] was found successfully.", nameToFind)
end
S2D_error
| Function | Description |
|---|---|
| S2D_error(string, ...) | The string to be formatted in the log followed by the variadic arguments. |
Example:
Assets =
{
	Textures =
	{
		{ name = "hero", path = "./assets/textures/hero.png", bPixelArt = true },
		-- ... More Textures
	},
	Sounds =
	{
		-- Add sounds
	}
}

-- Error Example

for k, v in pairs(Assets.Textures) do
	if AssetManager.add_texture(v.name, v.path, v.bPixelArt ) then
		S2D_log("Added texture [%s] successfully", v.name)
	else
		S2D_error("Failed to add texture [%s] at path [%s].", v.name, v.path)
	end
end

Physics Functions
S2D_EnablePhysics
| Function | Description |
|---|---|
| S2D_EnablePhysics() | Enables Box2D Physics. |
Example:
-- Enable Box2D Physics

S2D_EnablePhysics()
S2D_DisablePhysics
| Function | Description |
|---|---|
| S2D_DisablePhysics() | Disables Box2D Physics. |
Example:
-- Disable Box2D Physics

S2D_DisablePhysics()
S2D_IsPhysicsEnabled
| Function | Description |
|---|---|
| S2D_IsPhysicsEnabled() | Check to see if Box2D physics is enabled. Returns true if enabled, false otherwise. |
Example:
-- Enable Box2D Physics

S2D_DisablePhysics()
Render Collider Functions
S2D_EnableCollisionRendering
| Function | Description |
|---|---|
| S2D_EnableCollisionRendering() | Enables the rendering off all colliders. Colliders are usually hidden in game. Enabling is usually for debugging purposes. |
Example:
-- Show Box/Circle Colliders

S2D_EnableCollisionRendering()
S2D_DisableCollisionRendering
| Function | Description |
|---|---|
| S2D_DisableCollisionRendering() | Disable the rendering off all colliders. Colliders are usually hidden in game. |
Example:
-- Hide Box/Circle Colliders

S2D_DisableCollisionRendering()
S2D_CollisionRenderingEnabled
| Function | Description |
|---|---|
| S2D_CollisionRenderingEnabled() | Checks to see if collision rendering is enabled. |
Example:
-- Check to see if Collision rendering is enabled
if S2D_CollisionRenderingEnabled then
	S2D_DisableCollisionRendering()
end
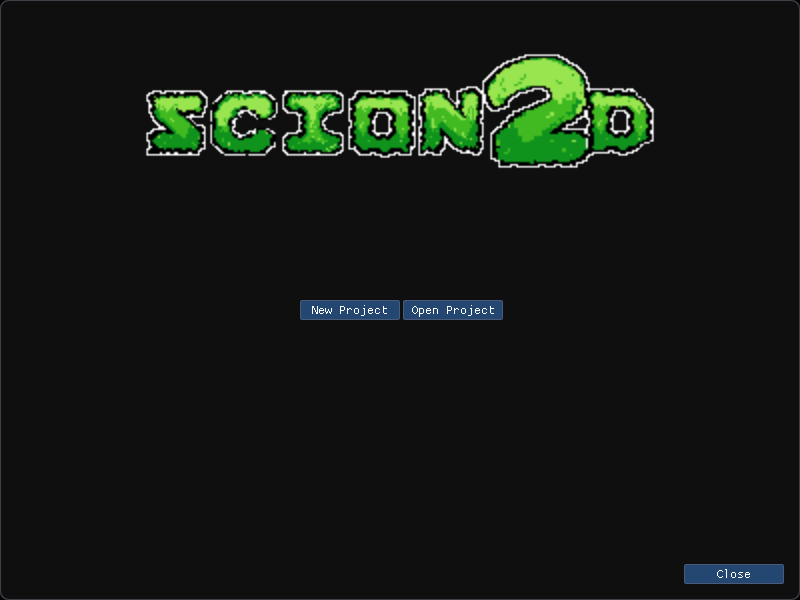
Editor
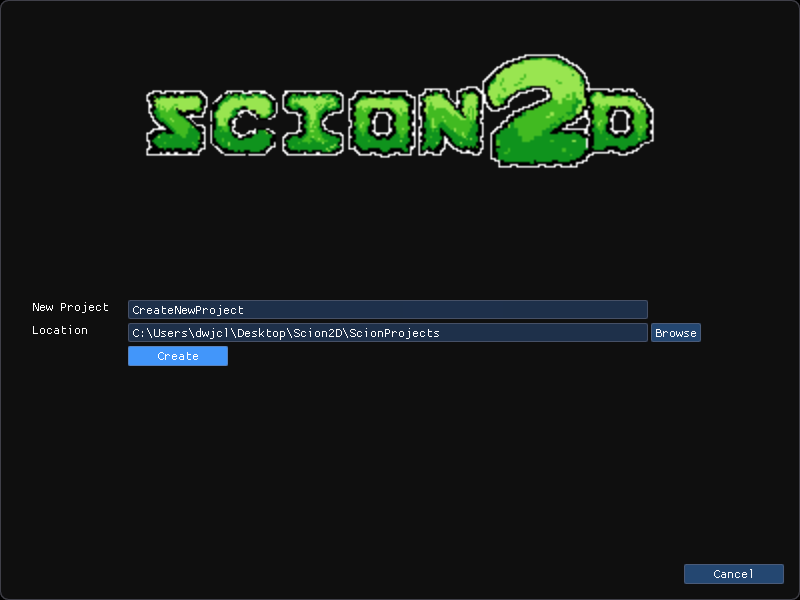
Project Hub
The Project Hub is used for creating a new project or loading a previously created project.
Creating a New Project
In order to create a new project, you first want to press the New Project button. This will open up a new page that will allow you to name your project and set the projects path.
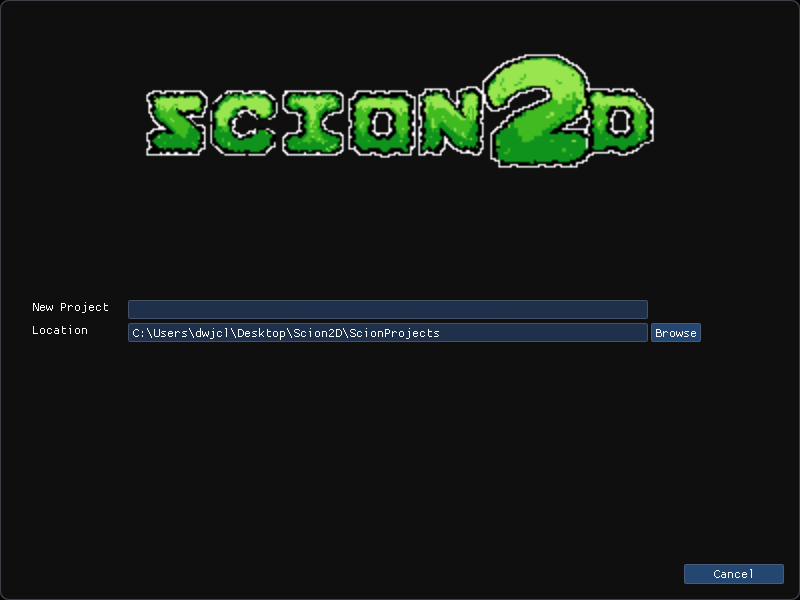
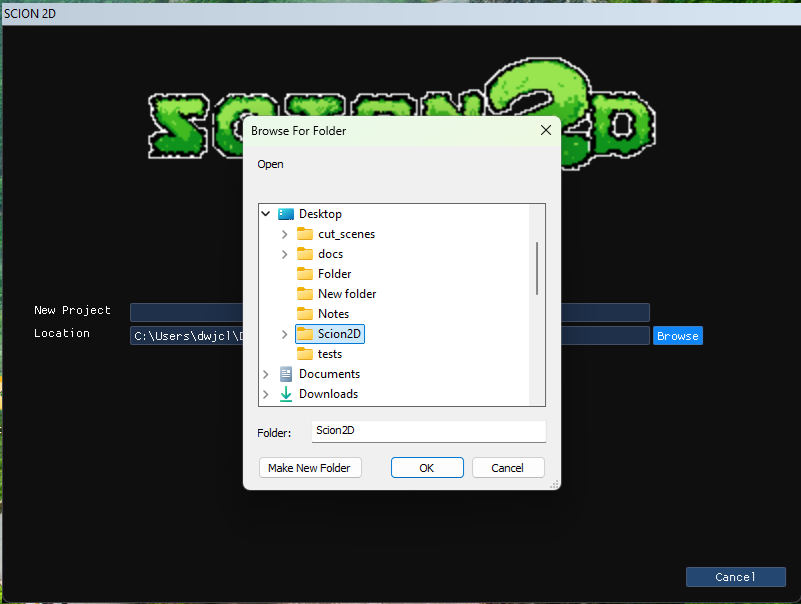
By default, the editor will create a folder [ScionProjects] directly wherever the editor's executable is located for projects. This folder is just a suggestion and does not have to be used. If you would like to set a new location, press the Browse button to open the folder dialog and set the desired folder you wish to use.
Once the project path has been set, all you need to do now is add in the desired name of the project and then press the Create button.
When the project is created, there are different folders and files automatically created for you.
Generated Folders
| Folder Name | Description |
|---|---|
| [Project_Name] | This is the main folder that holds the project. |
| SCION_2D | Scion project separator. |
| SCION_2D/content | The content folder will hold all of the games assets and scripts. Required by the editor. |
| SCION_2D/content/assets | The assets folder is an easy way to organize you assets. Required by the editor. |
| SCION_2D/content/assets/fonts | The fonts folder is another Optional generated folder used for organization. |
| SCION_2D/content/assets/music | The music folder is another Optional generated folder used for organization. |
| SCION_2D/content/assets/scenes | The scenes folder is Required. When new scenes are created, all of the generated files go into the scenes folder and into a new folder [SceneName]. |
| SCION_2D/content/assets/shaders | The shaders folder is another Optional generated folder used for organization. |
| SCION_2D/content/assets/soundfx | The soundfx folder is another Optional generated folder used for organization. |
| SCION_2D/content/assets/textures | The textures folder is another Optional generated folder used for organization. |
| SCION_2D/content/scripts | The scripts folder is Required The editor looks here to find the main.lua file. All other scripts should also be located here. |
| SCION_2D/config | The config folder is Required The editor looks here to find various game and editor config files. |
| SCION_2D/config/editor | The editor folder is Required This is where the editor config files are stored. |
| SCION_2D/config/game | The game folder is Required This is where the game config files and script_list.lua file is stored. |
Generated Files
| File Name | Description |
|---|---|
| [Project_Name].s2dprj | This is the main project file that is used for loading a saved project. This file is automatically generated and updated by the editor. Don't make changes to this file unless you know what you are doing! |
The main project file or .s2dprj is just a JSON file underneath; however, the editor expects the file to contain specific content in order to work correctly. You should not have to make changes to this file because it should be created automatically upon project creation and updated every time the project is saved.
| File Name | Description |
|---|---|
| main.lua | The main.lua file is the entry point for all scripts. The editor looks for specific functions located in the main.lua file in order to run the update and render functions. |
--[[
	Main Lua script. This is needed to run all scripts in the editor
	GENERATED BY THE ENGINE ON PROJECT CREATION. DON'T CHANGE UNLESS
	YOU KNOW WHAT YOU ARE DOING!
--]]

-- The engine looks for these two functions.
-- Please add your code inside of the update and render functions as needed.
main = {
	[1] = {
		update = function()
			-- Add your code to be update here
		end
	},
	[2] = {
		render = function()
			-- Add any extra rendering code here
		end
	},
}
You do not have to write all of your code inside of the main.lua file. It can all be separate scripts. For instance, if you create different game states in different files, you would only want to call the Update function of the current state inside of this update function. The rest of the code can be written in the loaded scripts. In order to load separate scripts, see Lua Functions for an example.